SiteLock is a website security and monitoring tool that eliminates cyber threats and keeps websites safe and secure.
Here you will learn how to provide SiteLock with access to your website files with Shared hosting. If you are configuring SiteLock for a website built with EasyWP, please refer to this guide.
In this guide, you will find:
- two ways to configure the SiteLock product for website files and database: using SFTP or FTPS connections;
- Database Settings Overview;
- possible SiteLock errors.
To configure the Site Lock service, please log in to your SiteLock dashboard. You will be redirected to the Setup Wizard tab at once.
or
Access your SiteLock dashboard >> Overview tab >> Site Settings >> Setup Wizard: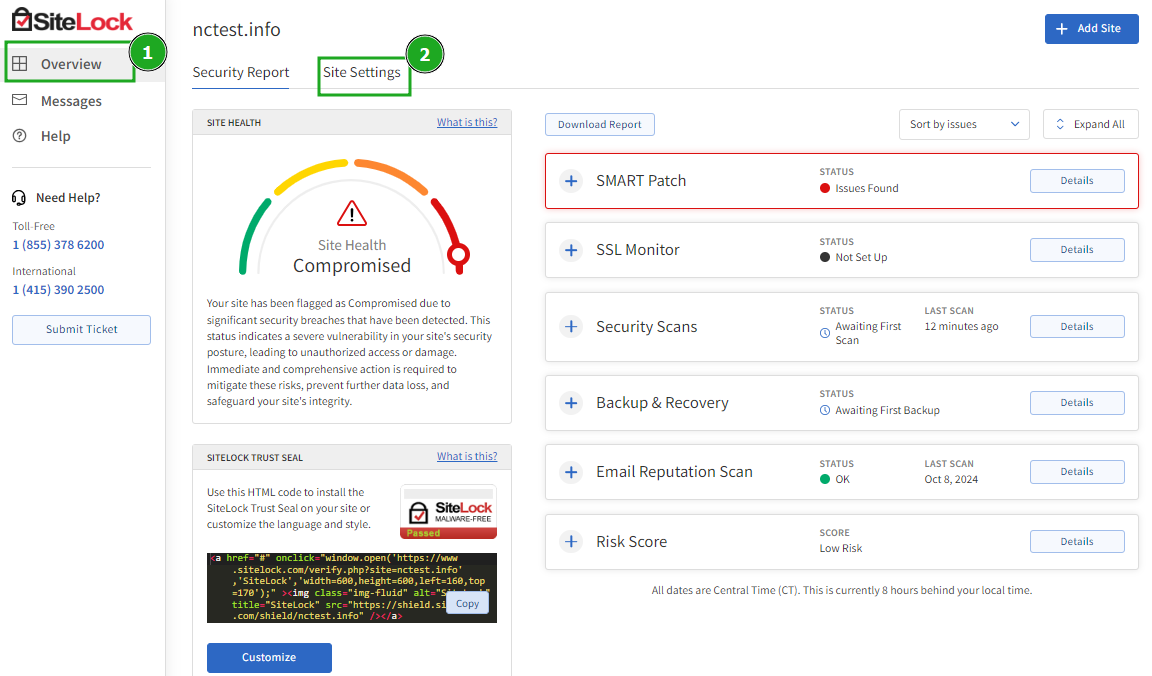
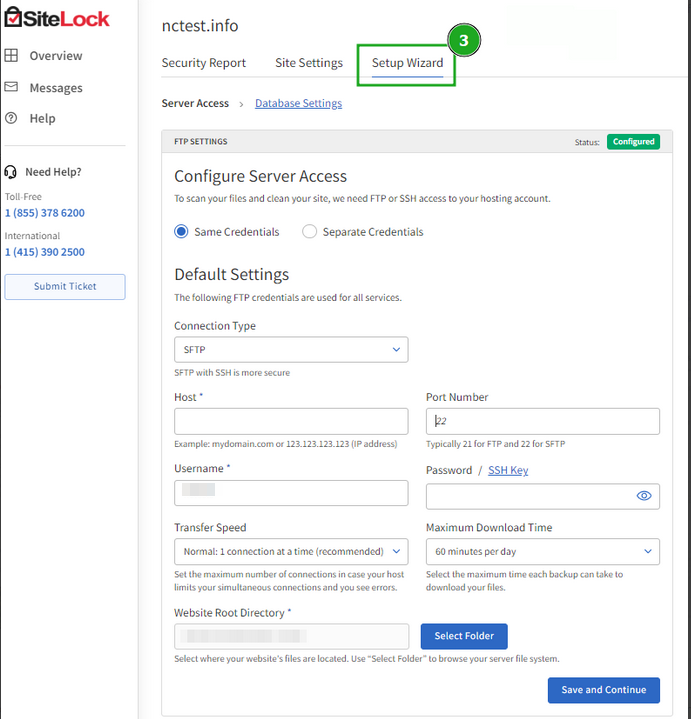
Server Access wizard guides the setup of FTP, FTPS, or SFTP access to your hosting accounts. This access is used for SMART File Scan, SMART Database Scan, File Backup, and Database Backup.
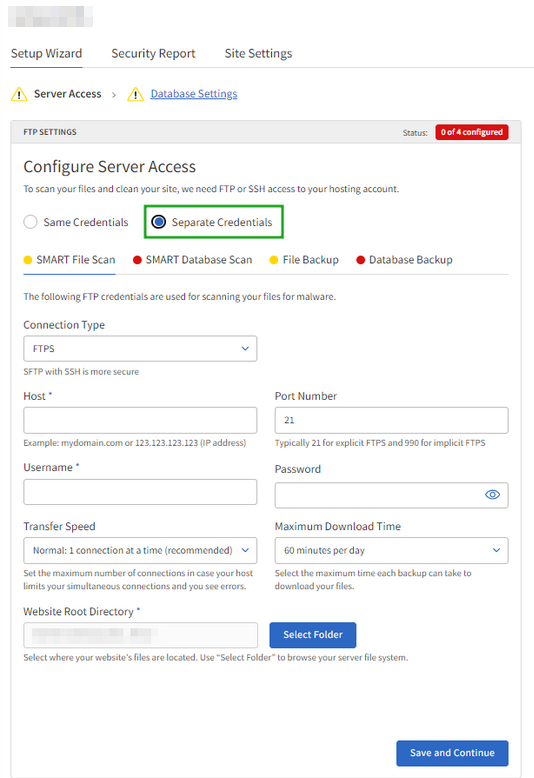
Here you can choose the “Same Credentials” setting to supply connection credentials for all four features (SMART File Scan, SMART Database Scan, File Backup, and Database Backup) or use "Separate Credentials" for each service: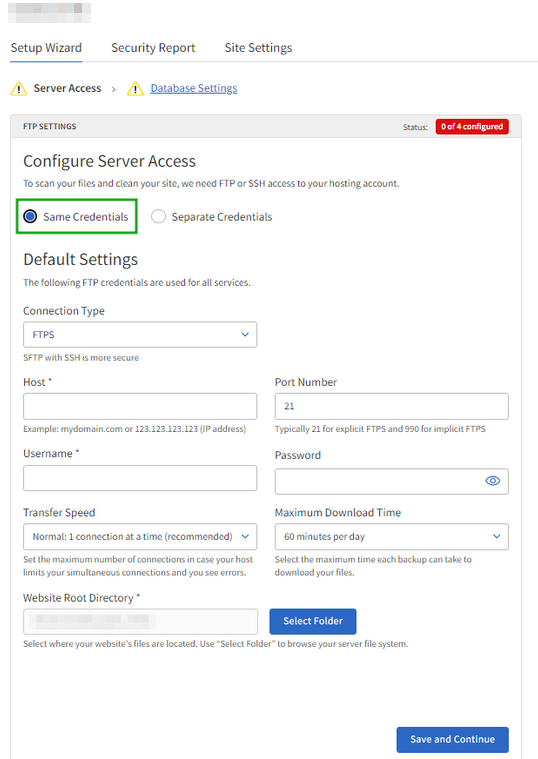
As an alternative, the settings to scan the files and clean the site can be changed in the SiteLock Dashboard >> Site Settings tab >> Server Access: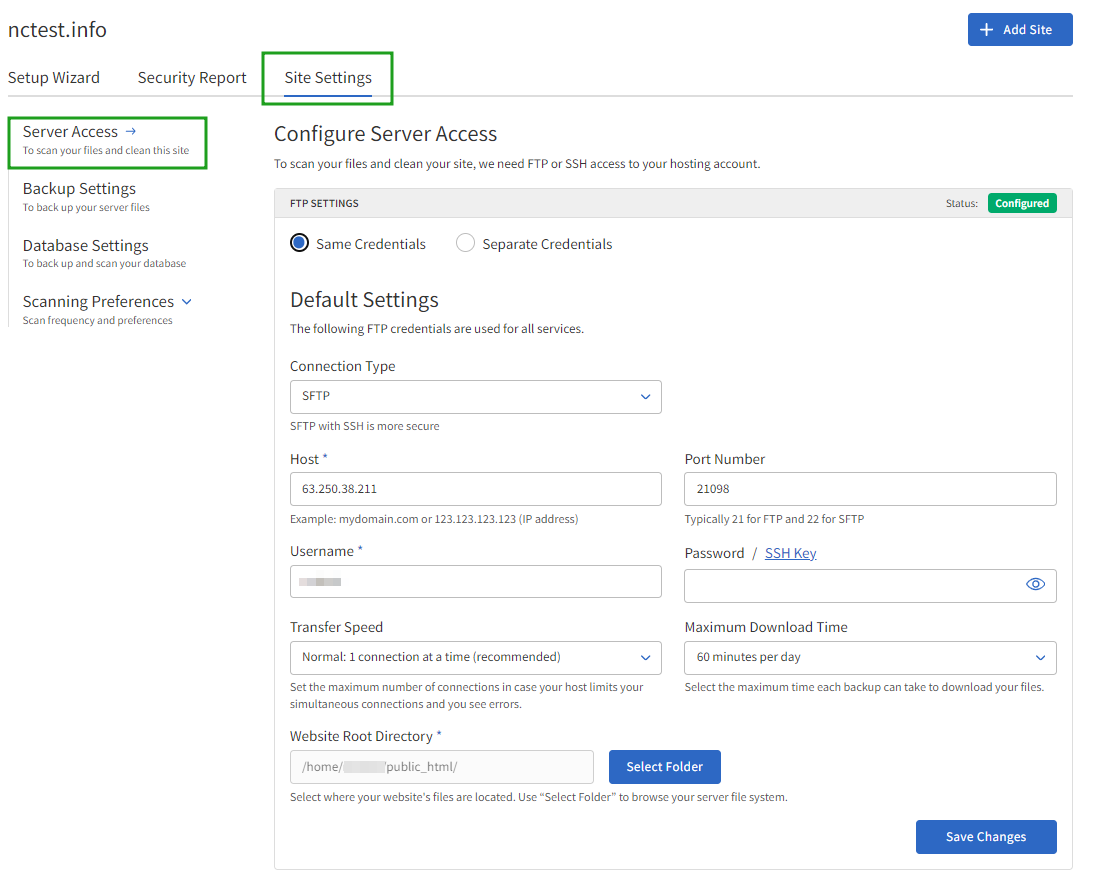
SFTP
Using SFTP instead of FTP is better for security purposes. Also, it is faster and has less limitations.
Using Password option:
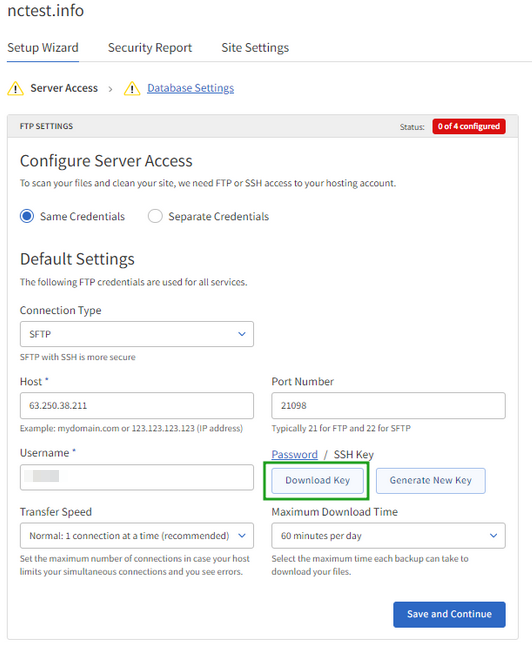
1. Select the SFTP connection, click the Password button, and fill in the configuration form with your SFTP details:
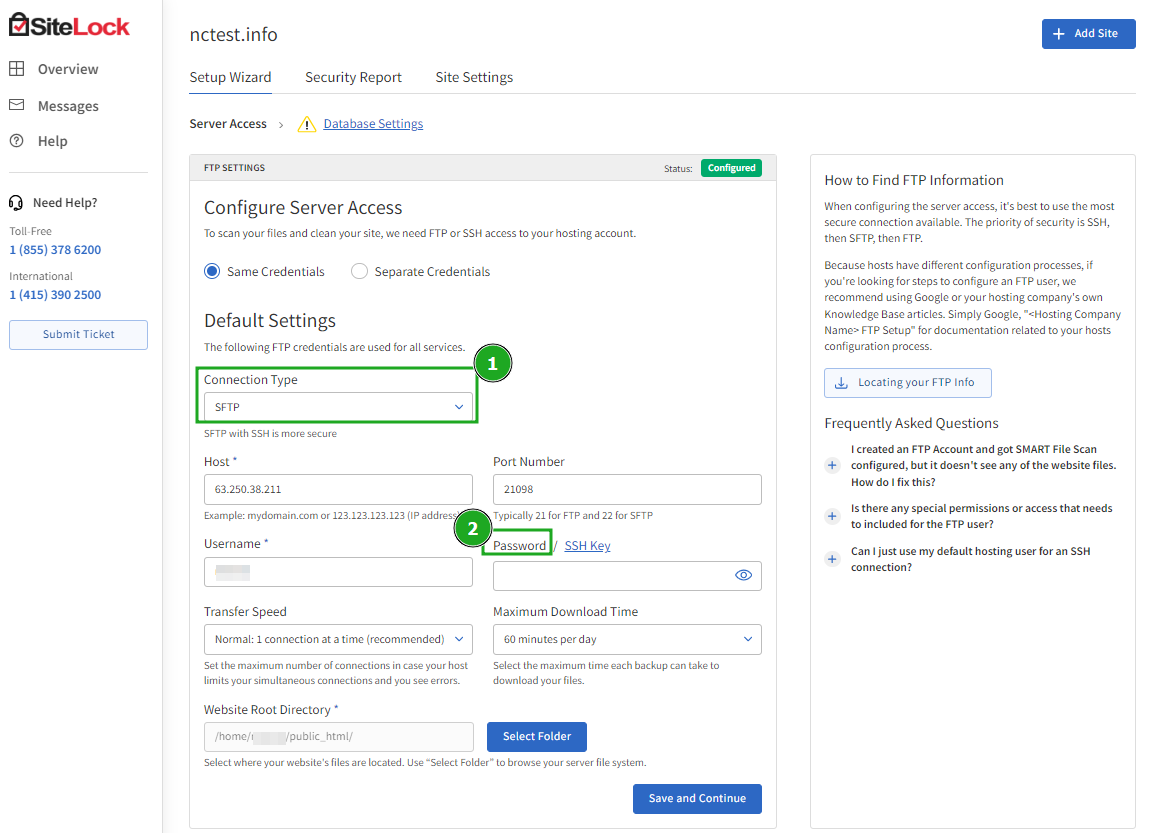
- Connection Type: SFTP
- Host: your servername or hosting account’s IP address
- Port Number: 21098
- Username: your cPanel username
- Password: your cPanel password
- Transfer Speed: Normal. Also, you can select the following options:
- 1 (normal) - Standard transfer speed
- 2 (fast): Faster transfer speed
- 3 (fastest): Fastest transfer speed, using multiple connections
- Transfer Speed: Normal. Also, you can select the following options:
- Maximum Download Time: 60 minutes. Also, you can select the following options:
- 30 minutes
- 60 minutes
- 90 minutes
- 120 minutes
- Maximum Download Time: 60 minutes. Also, you can select the following options:
- Website Root Directory: you should select the document root of your website (in our example, the website root folder is public_html).
NOTE: Your cPanel details (cPanel username and password) can be found in the email with the Your Hosting Account Details for yourdomain.tld subject. It was sent to the email address assigned to your hosting billing profile. If there are any issues with the cPanel password, you can reset it using this guide.
2. Click the Save and Continue button.
Using SSH key option:
1. Select the SFTP connection, and fill in the configuration form with your SFTP details:
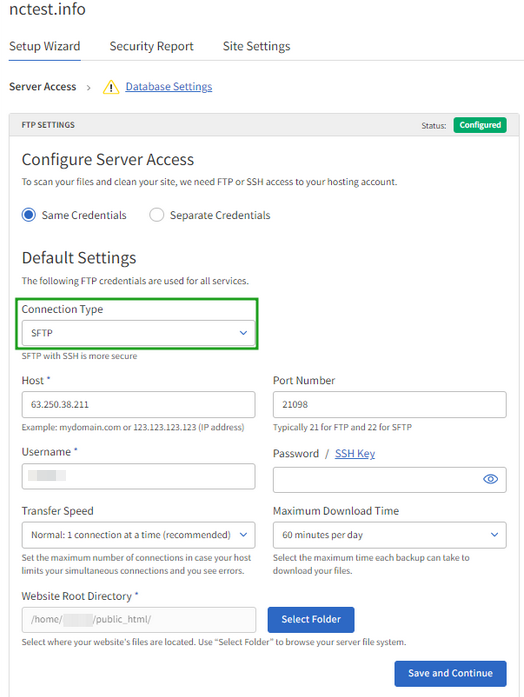
- Connection Type: SFTP
- Host: your servername or hosting account’s IP address
- Port Number: 21098
- Username: your cPanel username (can be found in the email with the Your Hosting Account Details for yourdomain.tld subject. It was sent to the email address assigned to your hosting billing profile)
- Password: your cPanel password
- Transfer Speed: Normal. Also, you can select the following options:
- 1 (normal) - Standard transfer speed
- 2 (fast): Faster transfer speed
- 3 (fastest): Fastest transfer speed, using multiple connections
- Transfer Speed: Normal. Also, you can select the following options:
- Maximum Download Time: 60 minutes. Also, you can select the following options:
- 30 minutes
- 60 minutes
- 90 minutes
- 120 minutes
- Maximum Download Time: 60 minutes. Also, you can select the following options:
- Website Root Directory: you should select the document root of your website (in our example, the website root folder is public_html).
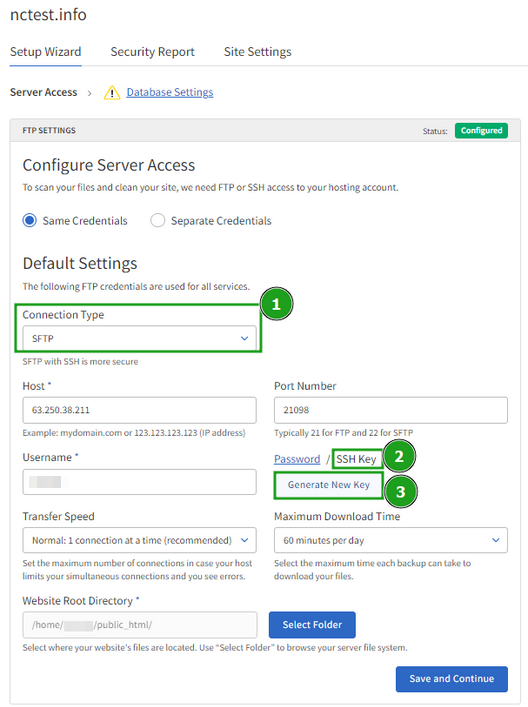
2. Click the SSH key button and press on the Generate new key pair option:
3. SiteLock will generate private and public keys. Once it is ready, download the file with the public key on your computer using the Download Key option. Also, do not click Save and Continue until you import the key:
NOTE: It is not possible to receive the private key as SiteLock keeps it on their side.
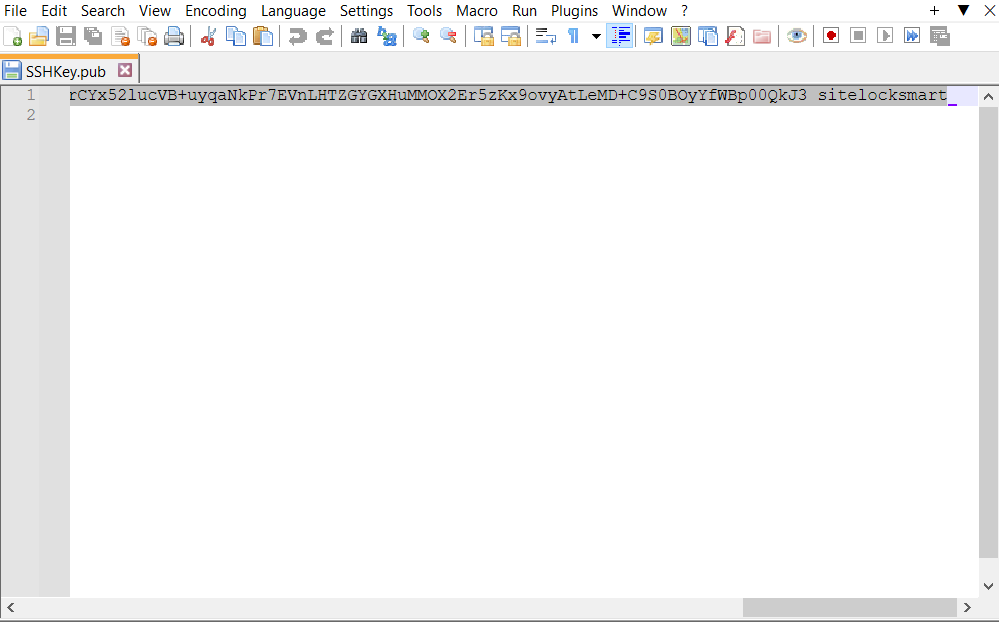
4. Open the downloaded file on your computer with any text editor and copy the generated public key:
Now it is needed to add this public key to your cPanel.
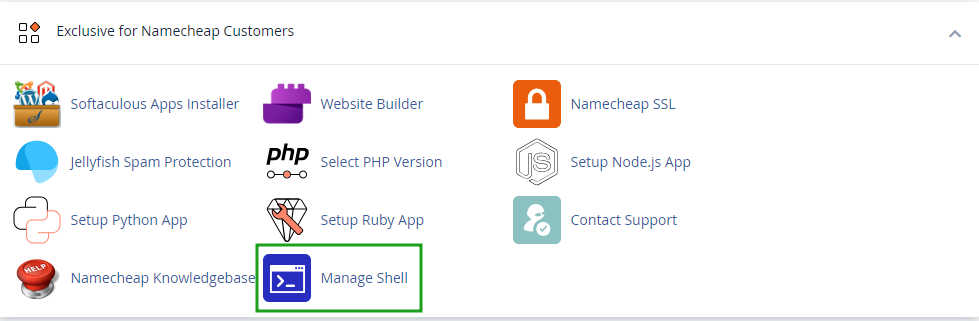
5. Go to your cPanel account >> menu Manage Shell:
6. Enable SSH by turning the toggle button on and click the Import Key button:

7. Fill in the following fields:
- Choose a name for this key (defaults to id_dsa) - enter the name of the key. You can name it whatever you want, we use the name "sitelockkey" in our example;
- The Paste the private key field should be empty as we do not have it and SiteLock keeps this private key on their side;
- The Passphrase field should be empty as well;
- The copied key from the downloaded file should be entered into the Paste the public key field.
And click Import:

You will receive the Success message:

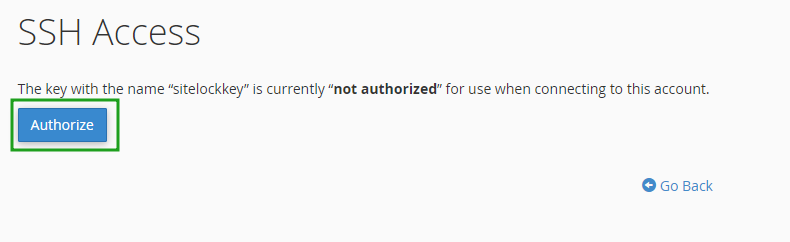
8. Now you need to activate the key. For this, go back to the Manage SSH Keys and click the Manage button near the imported key:
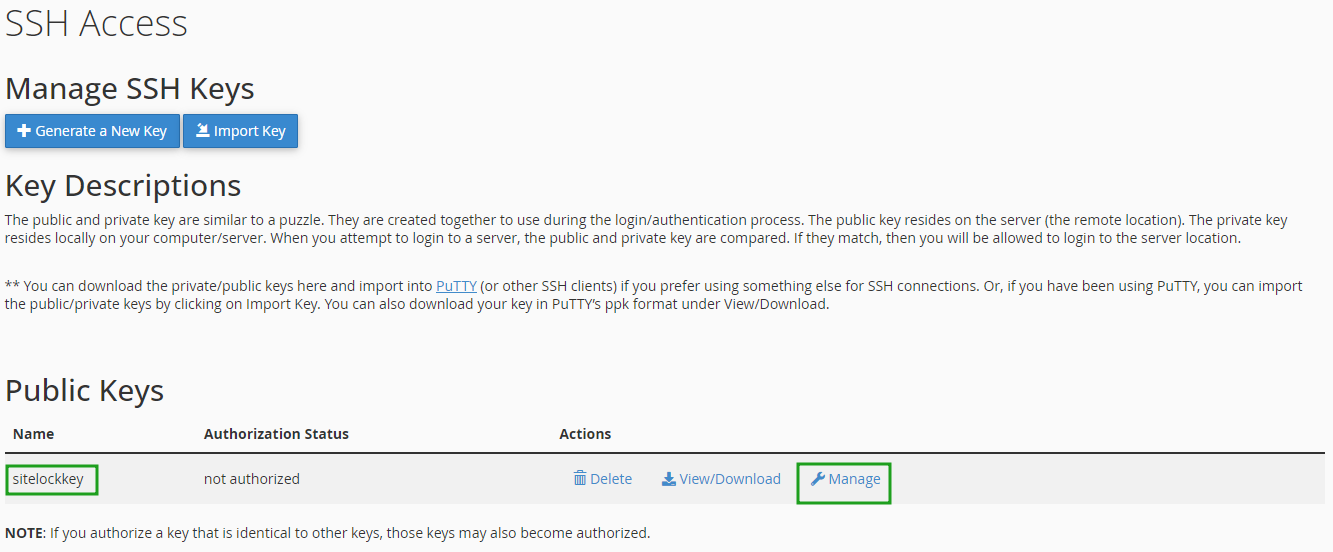
9. Click the Authorize button:

10. Access your SiteLock dashboard >> Setup Wizard and click Save and Continue.
FTPS
Please note that the FTP connection is not supported on our Business servers. We recommend using SFTP instead. FTPS can be used as an option.
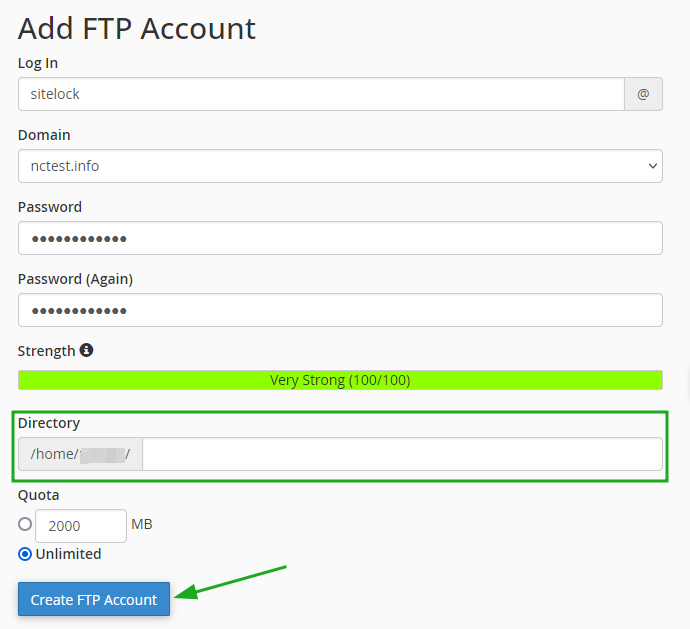
1. You need to create an FTP account in your cPanel. This requires your username, password, and hostname.
NOTE: Please make sure that the newly created FTP account has no data in the Directory field:
2. Log in to your SiteLock dashboard, and press the Setup Wizard tab.
or
Access your SiteLock dashboard >> Overview tab >> Site Settings >> Setup Wizard.
Server Access wizard guides the setup of FTP, FTPS, or SFTP access to your hosting accounts. This access is used for SMART File Scan, SMART Database Scan, File Backup, and Database Backup.
Here you can choose the “Same Credentials” setting to supply connection credentials for all four features (SMART File Scan, SMART Database Scan, File Backup, and Database Backup) or use "Separate Credentials" for each service.
3. Fill in the configuration form with your FTP details:
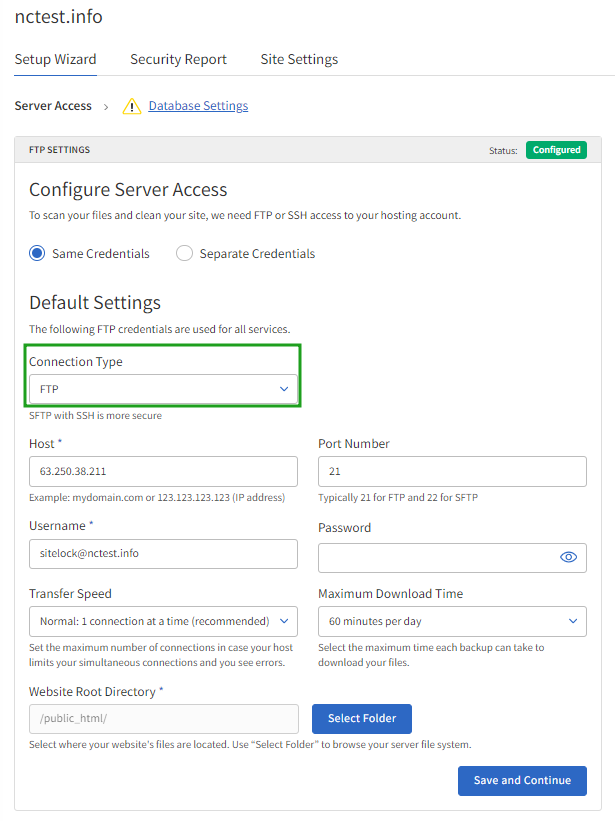
- Connection Type: FTPS (recommended) or FTP
- Host: your servername or hosting account’s IP address
- Port Number: 21
- Username: your FTP account username (the FTP created in the first step)
- Password: your FTP account password
- Transfer Speed: Normal. Also, you can select the following options:
- 1 (normal) - Standard transfer speed
- 2 (fast): Faster transfer speed
- 3 (fastest): Fastest transfer speed, using multiple connections
- Transfer Speed: Normal. Also, you can select the following options:
- Maximum Download Time: 60 minutes. Also, you can select the following options:
- 30 minutes
- 60 minutes
- 90 minutes
- 120 minutes
- Maximum Download Time: 60 minutes. Also, you can select the following options:
- Website Root Directory: you should select the document root of your website (in our example, the website root folder is public_html).
4. Click the Save and Continue button.
Database Settings Overview
As an alternative, the settings to scan and back up the website database can be changed in the SiteLock Dashboard >> Site Settings tab >> Database Settings.
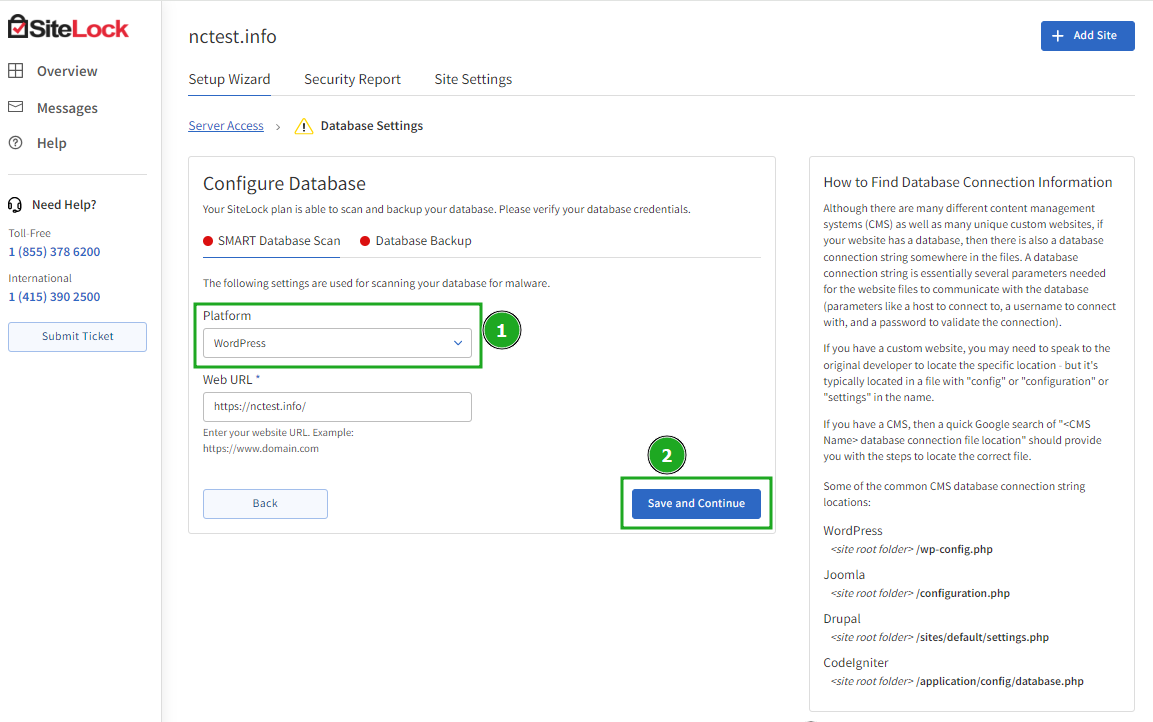
1. Once you configure Server Access, you may go to the second step of Setup Wizard - Database Settings tab >> SMART Database Scan. Database Settings Wizard guides configuration of SMART Database Scan & Database Backup:
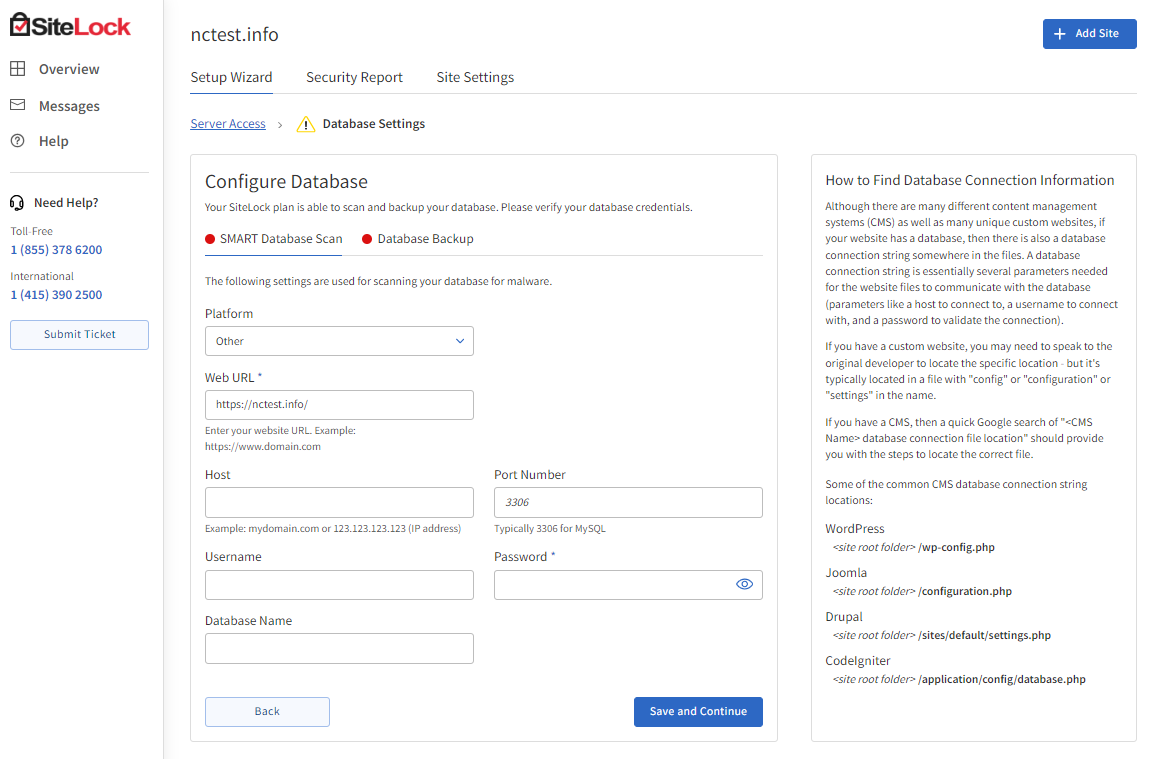
2. Here you need to provide the details of your website:
- Platform: WordPress
- Web URL: should be filled in automatically with your website URL. However, if there is no information, please enter your website URL (for example, https://www.domain.com)
NOTE: You can select the CMS type (if you use another CMS, but not WordPress) from the drop-down list of the Platform field:
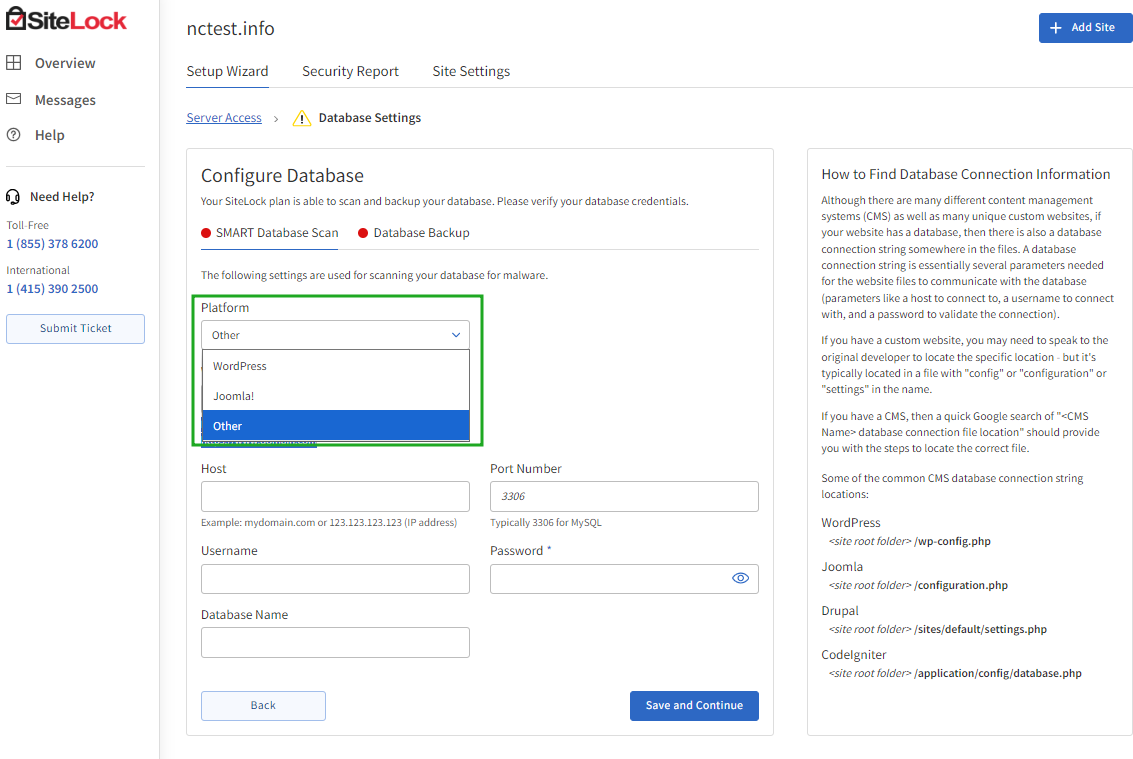
In case to set up a scan for another CMS, but not WordPress and Joomla!, select Other and proceed with the configuration:
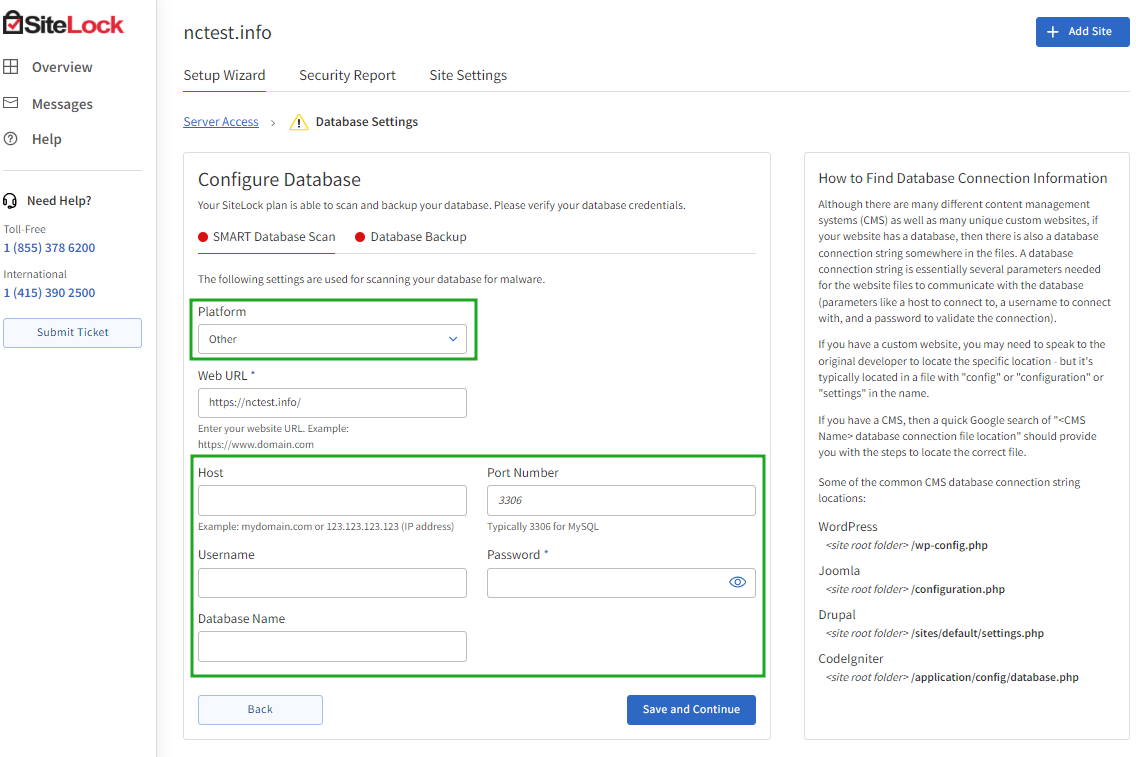
- Host: your servername or hosting account’s IP address;
- Port Number: defines different ports for database connection (localhost:3306);
- Username: a username required for database access;
- Password: a password required for database access;
- Database Name - can be found in the configuration file of your website (like wp-config.php for WordPress, configuration. php file for Joomla!, parameters.php for Prestashop, etc.).
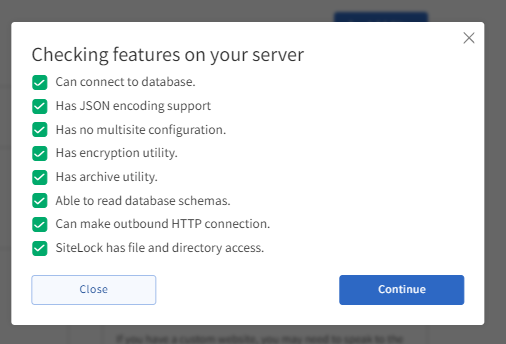
3. Click Save and Continue to check all the provided settings by SiteLock. You will see the Success pop-up window:
4. Once you click the Continue button, you will be redirected back to the Database Settings tab to configure Database Backup:

- Database Backup Frequency: select how often to back up the database (daily, weekly, monthly, quarterly, never);
- Web URL: enter your website URL (for example, https://www.domain.com);
- Host: the server address where the MySQL server operates, typically, localhost. Your servername or hosting account’s IP address;
- Port Number: defines different ports for database connection (localhost:3306);
- Username: a username required for database access;
- Password: a password required for database access.
Possible SiteLock errors
Sometimes you may face such errors during SiteLock configuration:
Unable to verify docroot (Shared servers)
Such an error may appear during SMART Wizard configuration using SFTP details. To test the website connectivity, SiteLock creates a test file in the root directory you choose. The inability to access the test file will cause the "Unable to verify docroot" error:
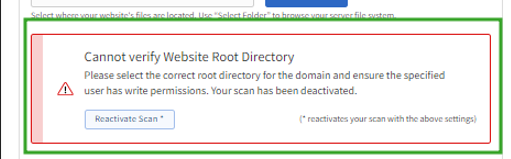
Such issue may come up due to various factors - some of the common causes are:
- invalid document root (it can be double-checked in the "Domains" menu of cPanel);
- restrictive permissions on the root directory (they should be set to 750 or 755 in most cases);
- URL restrictions applied through the .htaccess file located in document root;
- website inavailability caused by account suspension, Legal & Abuse blocks, or resource issues.
In case the document root is correct, you may click on the "Reactivate Scan" button under the error to force specified settings and finalize the SiteLock configuration.
Max retries exceeded (on VPS/Dedicated servers only)
Such error might come up on VPS/Dedicated Server plans due to SiteLock IPs not being whitelisted. To fix that, you should add the following subnets to the whitelist of your firewall software (CSF is the default firewall on cPanel-based servers), and entries can be added as described here:
- 184.154.36.160/27
- 184.154.139.0/26
- 184.154.76.0/26
- 198.20.67.192/27
In some cases, it may also be caused by FTP server misconfiguration. While we do not provide assistance with FTP/firewall configuration on servers without control panels, it should generally be fixed on cPanel-based servers once steps from the following guide are performed.
